Some time ago I received request to automate file transfer between FTP server and Development systems. Both, FTP server and Development system, are Windows-based. FTP server was running FTP over SSL only, so that automatically eliminated built-in Windows FTP command-line app. As I was using WinSCP in the past decided to do quick check if it is possible to use it in batch mode, so I can create script and run it on Windows Task Scheduler to automate whole process.

Prepare environment – application and folders
Here is folder structure and script files I created on destination machine (to which files were transferred):
- C:\Apps\WinSCP – folder contains binary files of portable WinSCP application
- C:\Data\Scripts – folder contains batch script to run FTP transfer and script with commands for FTP
- C:\FTP – transfer folder to which files will be transferred from remote site
- C:\Data\Scripts\ftprun.cmd – batch file with command which starts WinSCP with certain parameters
- C:\Data\Scripts\ftpscript.txt – text file which contains commands for WinSCP. It is passed to WinSCP as a parameter by ftprun.cmd script
Then download portable version of WinSCP (http://winscp.net/eng/download.php) and unzip to C:\Apps\WinSCP folder.
Create connection profile in WinSCP
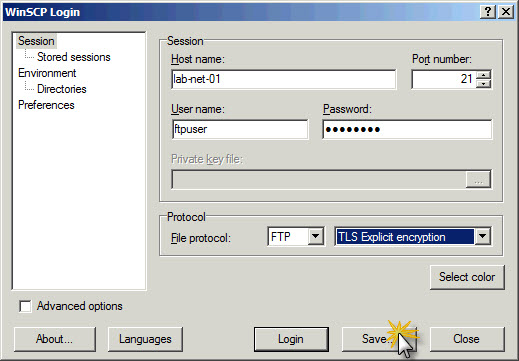
First we need to define connection profile in WinSCP. That connection profile will be used later in ftpscript.txt to establish connection with FTP server. In order to define connection profile run winscp.exe from C:\Apps\WinSCP folder and populate WinSCP Logon window with all details about connection (including password). Once all details are filled in click Save…
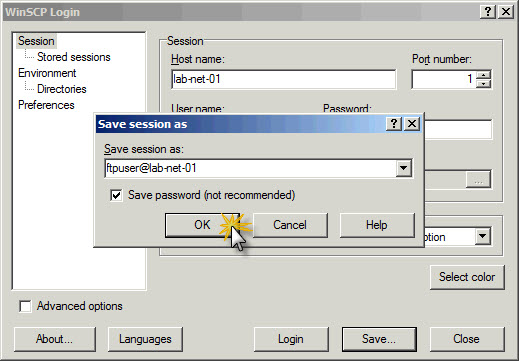
In Save session as… window name your session (that name will be used later on in ftpscript.txt to open connection) and make sure that Save password (not recommended) checkbox is ticked. We want to remember password in connection profile (WinSCP stores passwords in encrypted form). Otherwise we will have to entre clear-text password in ftpscript.txt file.
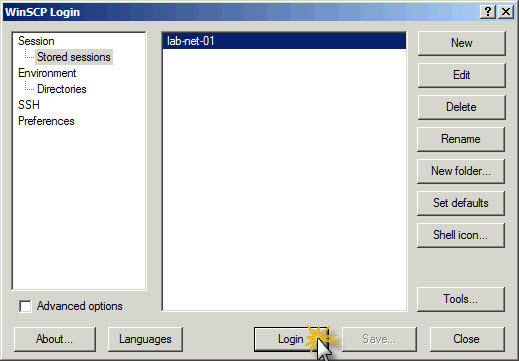
Once connection profile is saved WinSCP will show it on the list in WinSCP Login window. To make sure that all details are correct highlight connection you just created and click Login button. After that WinSCP will attempt to establish connection using parameters just delivered.
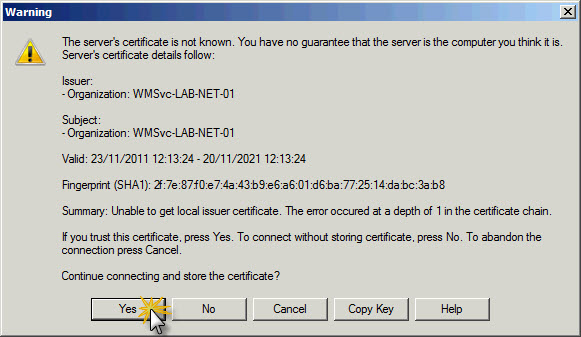
If connection is initiated for the first time and FTP server has been defined as FTP with TLS then we can expect that WinSCP might request acceptance for certificate presented by the server. In that case Warning windows will show up with all details of the certificate (as on screenshot below – you can see default, system-generated certificate which has been assigned to FTP site on IIS). Accept certificate by clicking Yes, so WinSCP can store information about certificate in configuration file for future use.
NOTE: It is important to establish connection to FTP server with TLS at least once before transfer task will be sceduled. That way we can accept and save information about certificate, so WinSCP will nit be asking about that later.
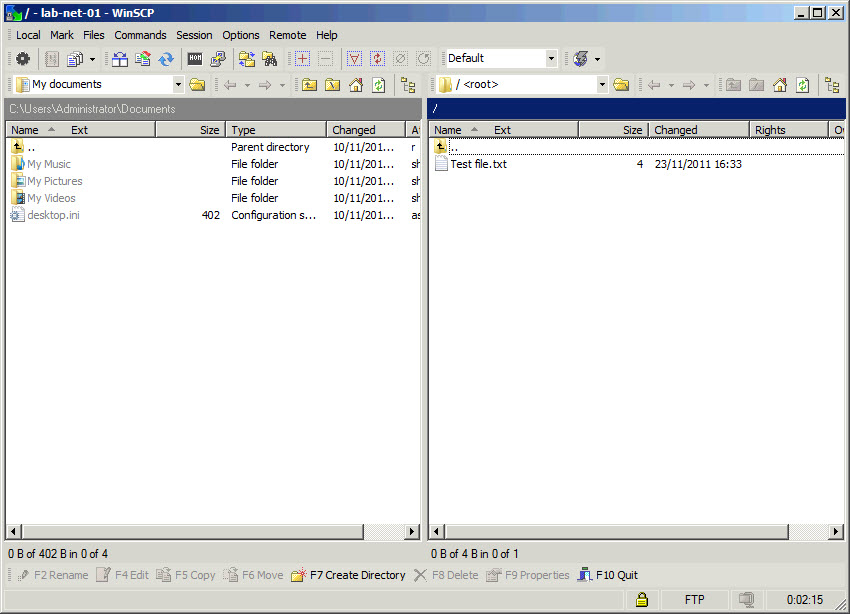
Once certificate is accepted and other connection details are fine we should see two panels with files. One panel shows files on our computer, second panel shows files on remote FTP server (in that case there is only one file Text file.txt). That indicates that we can establish connection successfuly and all parameters are entered correctly to connection profile.
As we have connection profile created and saved in WinSCP configuration we can proceed to next step in which we will create some scripts as preparation to automated transfers.
Prepare script to run FTP transfer and script with commands for FTP
In here we will create two scripts which will help to automate file transfer with WinSCP.
- ftprun.cmd – batch file responsible for starting WinSCP command with appropriate parameters
- ftpscript.txt – list of commands for WinSCP to execute
NOTE: Both files will be placed in C:\Data\Scripts folder.
ftprun.cmd
C:\Apps\WinSCP\winscp.com /script=C:\Data\Scripts\ftpscript.txt
ftpscript.txt
option batch continue
option confirm off
open lab-net-01
lcd C:\FTP
synchronize both -delete
synchronize both C:\FTP /
exit
NOTE: In ftpscript.txt file line open lab-net-01 indicated connection profile name which will be used to establish connection.
Before scheduling script it is worth to check how it works and we get expected results, so from Command Prompt you can just run ftprun.cmd and see how it behaves and if everything is transferred according to the plan.
Here is example output of ftprun.cmd command started before scheduling:
C:\>C:\Data\Scripts\ftprun.cmd
C:\>C:\Apps\WinSCP\winscp.com /script=C:\Data\Scripts\ftpscript.txt
batch           continue
confirm         off
Connecting to 172.16.90.41 ...
Connected with 172.16.90.41, negotiating SSL connection...
SSL connection established. Waiting for welcome message...
Connected
Starting the session...
Reading remote directory...
Session started.
Active session: [1] lab-net-01
C:\FTP
Comparing...
Local 'C:\FTP'  Remote '/'
Synchronizing...
Local 'C:\FTP'  Remote '/'
C:\FTP\Test file.txt      |          0 KiB |    0.0 KiB/s | ascii  | 100%
Comparing...
Local 'C:\FTP'  Remote '/'
Synchronizing...
Local 'C:\FTP'  Remote '/'
Test file.txt             |          0 KiB |    0.0 KiB/s | ascii  | 100%
C:\>
Once everything went well we ready to create scheduled task to trigger file transfer automatically. If test connection failed for some reason it needs troubleshooting then.
Creating task in Task Scheduler
In order to schedule file transfer we will use Task Scheduler, which is built-in Windows tool. Task Scheduler is located in Start / All Programs / Accessories / System Tools.
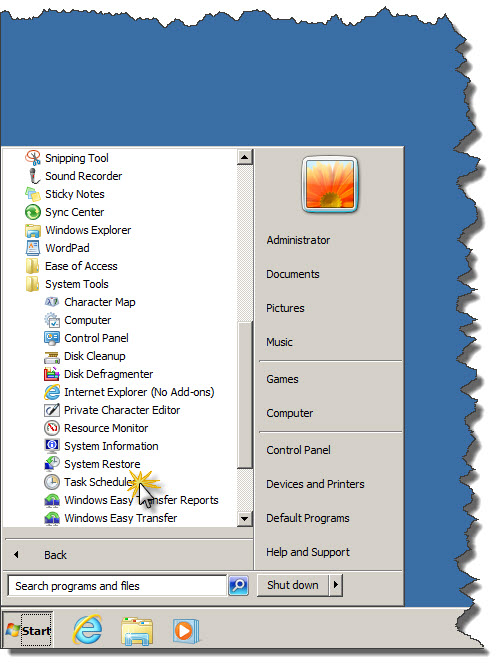
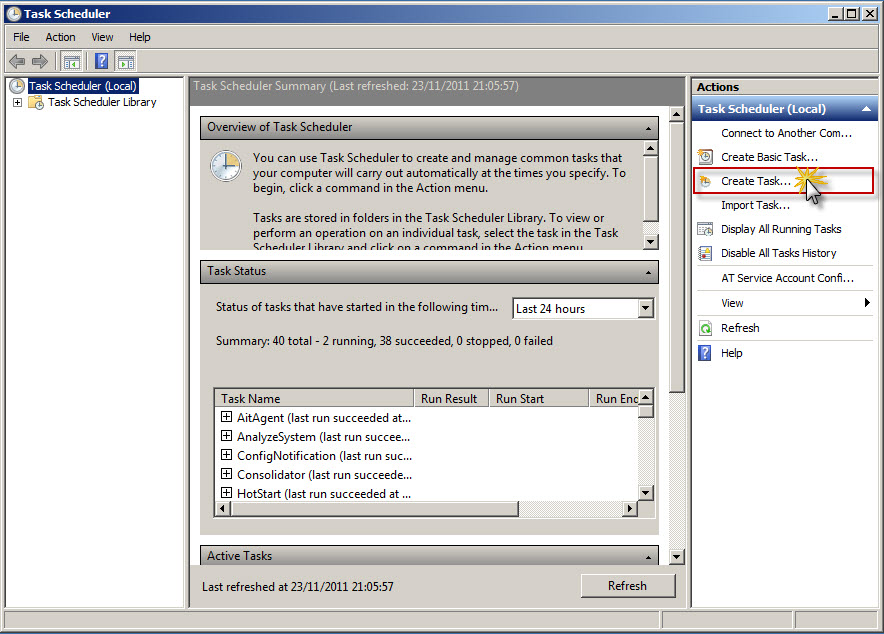
When Task Scheduler window will appear on the screen locate Create Task… in Action panel and click it.
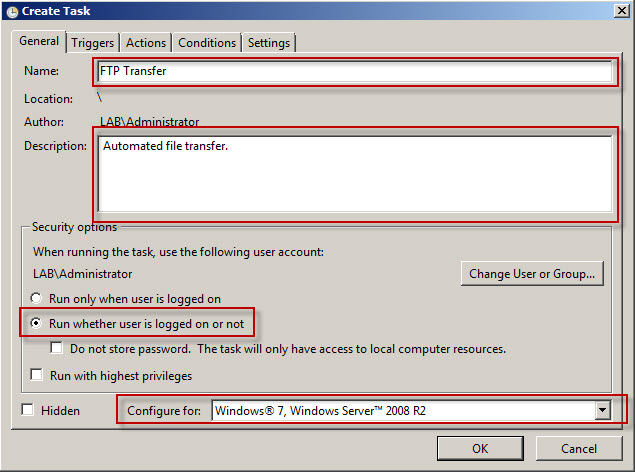
Next on the screen Create Task windows will appear with General tab active by default. In here we can name task (ie. FTP Transfer), put some description which explains what this task suppose to do. Make sure that option Run whether user is logged on or not is chosen. That will allow task to run in background.
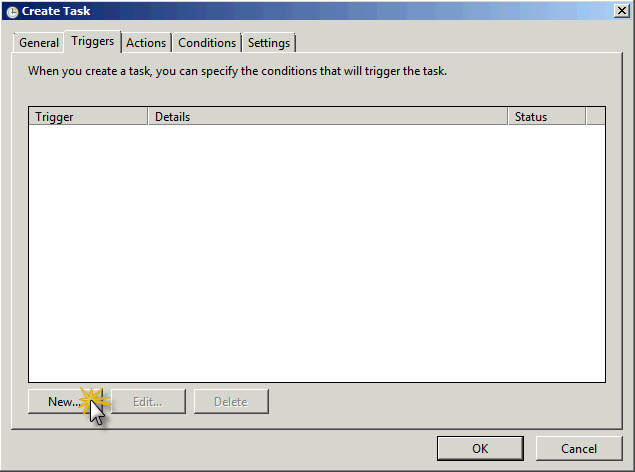
Next click on Triggers tab and click New… button. That will allow to create schedule for the task.
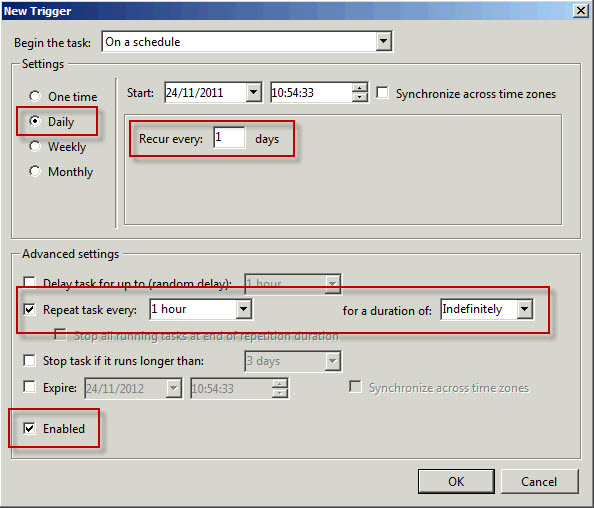
You will see New Trigger window on the screen. Indicate in Begin the task that we want to run task On a schedule. Then define schedule for file transfer. On example screenshot schedule indicates to run task every day, every hour indefinitely. Also make sure that task will be Enabled (checkbox at the bottom of New Trigger window).
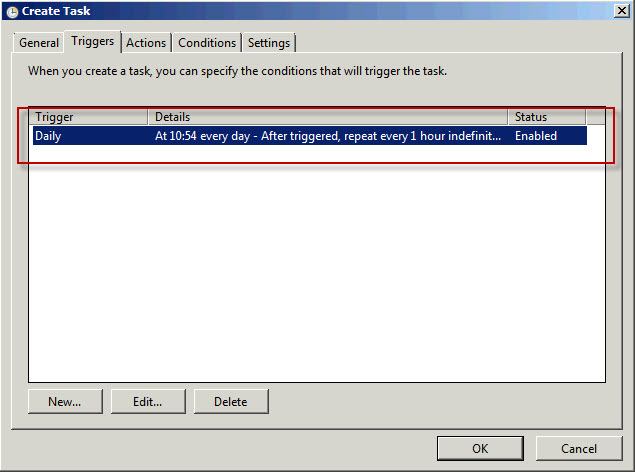
When you confirm New Trigger with OK button schedule will be added to Triggers list as shown on screenshot below:
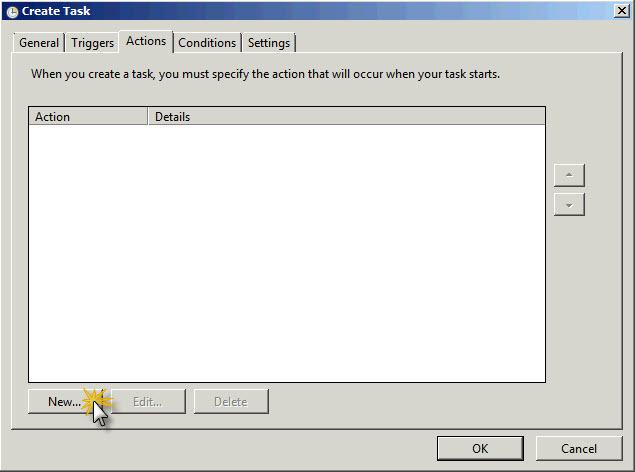
Now we can move to Actions tab. On this tab we will define which command should be triggered by task. Click New… to define command.
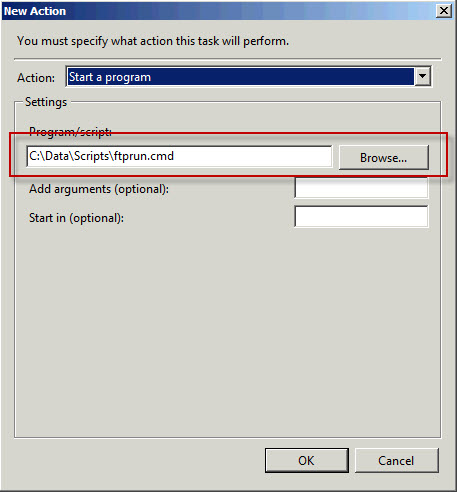
In New Action window indicate Action as Start a program. Then in Settings section in Program/script textbox enter C:\Data\Scripts\ftprun.cmd (this is batch script which will execute WinSCP with parameters).
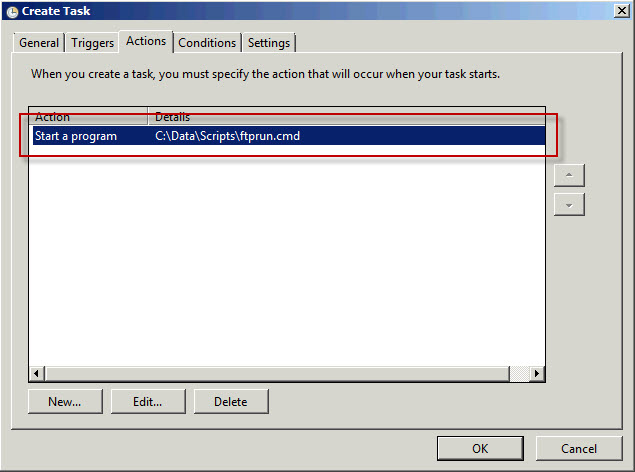
Once action is defined click OK button and you should see our command added to action list as on the screenshot below:
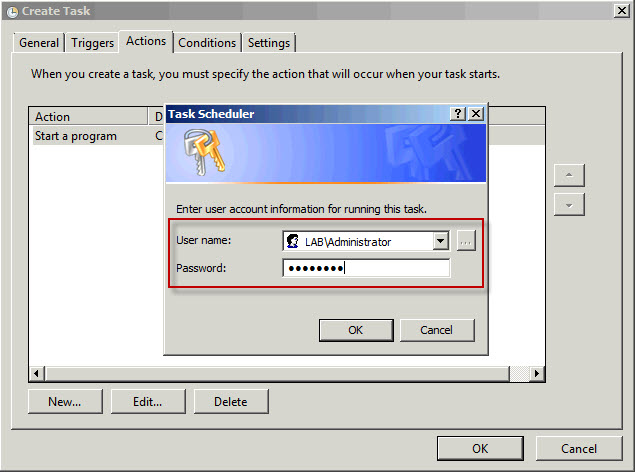
All parameters have been defined and now w can confirm task configuration by clicking OK button. Just after that system will request credentials for that task. It means that we can enter username and password for account we want to run this tak under. In example below I just used domain administrator account.
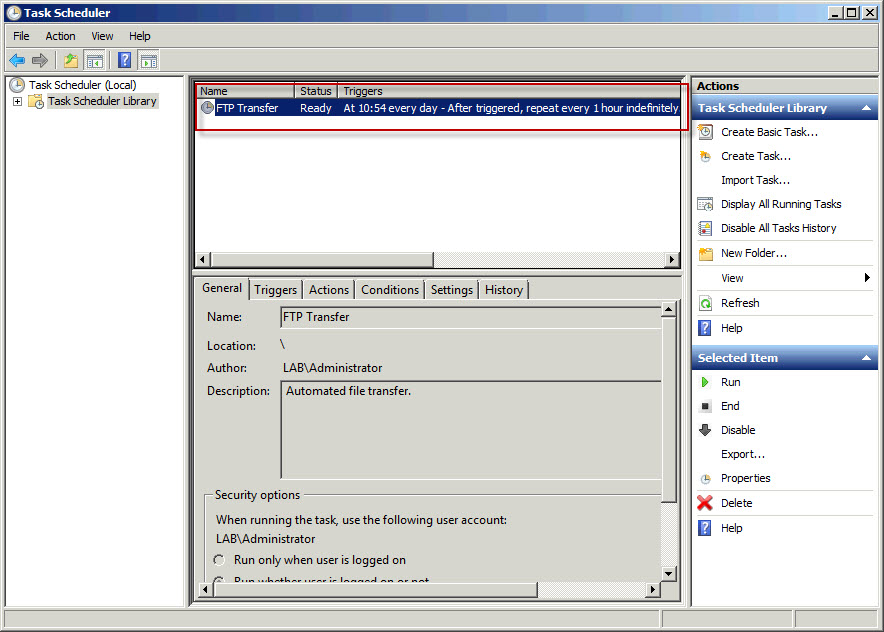
After credentials will be entered in Task Scheduler you can see task added with all parameters defined.
Now it is only matter of time to check if task will run accodingly to schedule we defined and if all files will be transferred correctly.

Thanks it is very helpful.
With the script you provided, I am able to sync the source and destination, I am not able to figure out how to only sync source with destination (only upload files to destination and not vice versa), When i run the script it syncs the source and destination. any files existing on destination if not present on source and synced back – is it possible to change this?
Also, is there a way the to delete the files from source once successfully uploaded.
Many Thanks
Sk.
Thanks, figured it out.
I had to use
synchronize remote
instead of “synchronize both”
Also, to be able to delete files after upload I had to use the put command with -delete switch.
Hey,
thanks for sharing. I just had a look into description and your comments.
But I can see you worked out solution which is suitable for you 🙂
I’m glad and thanks again for sharing this.
Thanks,
SKufel
Thanks. It is very helpful and clear instruction.
in case other people may need synchronize options. Here is the links that you can check.
http://winscp.net/eng/docs/scriptcommand_synchronize
Thank you very much for this site. I spent a day trying to figure out SFTP auto authentication using a command/batch file.
This is a reasonable priced SFTP Library you can use with VB.NET:
https://www.kellermansoftware.com/p-41-net-sftp-library.aspx
This is a reasonable priced SFTP Library you can use with VB.NET:
https://www.kellermansoftware.com/p-41-net-sftp-library.aspx
What script do i need to use in order to pull the latest data (latest date) from server?
To list files and folders by date you can use: ls -lt.
That command will give you list of files and folders sorted by time modified.
This is very much helpful and very close to my requirement.I have two question here
1. Can I modify the above script for filezilla?
2. What script do I need to use to pull files based on filename?
Ad. 1.
You can modify script for Filezilla if Filezilla offers command line parameters which allow to use it in batch mode
Ad. 2.
You can just use commands get or put… as synchronize allows to synchronize whole directory.
Many Thanks, I will try that.
Thanks! Spent so long searching for a decent example and this works perfect
Hello,
Thanks a lot!!
We are using the synchronize local option, but i had to implement the cd command before the synchronize command otherwise the program would also copy the last visited directory from the GUI.
Like This:
lcd C:\Local\dir

cd /Remote/dir

synchronize local -delete

synchronize local C:\Local\dir /Remote/dir
Hi,
Thank you so much for this useful post. I had to modify the text file to perform get instead of synchronize. I am able to transfer files, but would like to know if there is a way to specify dynamic file names. We receive files with date stamp. I tried using variables, but as it is a text file, it failed. Currently I am using * in the file name. But it would be more complete if I can use variables and provide the full file name dynamically.
Thanks!
Set up the files exactly as you indicated and I’m getting a last run result as “(0x1)”
Any suggestions?
Thanks Big. Very Helpful. Straight to the point and easy to comprehend. Not even WinSCP website could hep me until I landed on this blog.
This is awesome, thank you!
Thank you so much for this post.
It helps me a lot and saved my time.
Appreciate your efforts.
Thank you!
Hi.
Can you tell me, how to create script which moves remote folder (with files) to local drive?
Than you!
M.
Hi This is very nice..But I want to download only a particular path from SFTP not all the files and folders.
Here how I need to include only a particular path
option batch continue
option confirm off
open comsoft@sftp.maples.com
lcd \\192.168.xxx.xxx\BnBCoding\2015\Internal\TScoding\Mar-15\MBEE\
synchronize both \\192.168.xxx.xxx\BnBCoding\2015\Internal\TScoding\Mar-15\MBEE\ /
exit
I used cd /FromPmax/20130805/C/
But its downloading all files and folders..
Kindly help!
Hello,
I found the way its working only if we provide path name without space,if the path name has space in between its getting too many parameters in lcd and also cd
Any one help here 🙂
FTP Manager Lite is a better freeware FTP and SFTP client software. The clean interface is super easy to use. It will perform your files transfers quickly and efficiently. It is one of the best freeware FTP clients that also supports FXP.
The content is very helpful. Let us know, if we have provision to copy files on Linux server till last 7 days. Thank you.
Provision to copy files from Linux server to windows server through WinScp
Thnak you.
This was great, thank you so much.
Thanks Buddy
Nice script..
Hey, it’s a very nice tutorial.
May I ask you, I only want to upload to certain folder in server with FTPS,
and also download to certain folder in local.
How do I do that?
When I am using the following command in winscp command line
synchronize remote
but I got error “turn on ‘Ignore permission errors’ option”
also I tried the following command
synchronize remote -nopreservetime -nopermissions
this command is not working
which changes are required in the above command
Seems that this problem is ongoing for some time.
You can try workaround with INI file as described here:
https://winscp.net/forum/viewtopic.php?t=6724
you are da man!
Hi bro,
I also have the same situation as you before,
would you mind to share to me the line?
this is mine :
option batch continue
option confirm off
open FTPS
lcd C:\FTP
cd /INTERFACE
synchronize both -delete
synchronize both C:\FTP /INTERFACE
how could you synchronize one-side and delete files after uploading
i did solve my situation, thanks for the references guys
Hello,
Is there any way to transmit the data from Linux to Windows automatically once we launch winscp from windows? As i am able to connect to the remote linux machine from windows machine, and manually copy the data from Linux diretory to Windows directory. But is there any way or option to automatically copy the data from Linux to Windows? As Linux machine is the Source machine and Windows is Destination machine.
It is the same way as synchronizing the other way, but you just change order of folders to synchronize.
Instead of C:\FTP / to / C:\FTP.
Of course instead of / you can use any Linux folder you want.
Hello Skufel,
In Linux the script which i wrote was:
mount -t cifs -o username=aaaa //x.x.x.x/test /mnt/windows/
Now what would be the script similar to the above one and where do we need to write the script?? In Windows? Kindly explain it in detail, Skufel.
Regards,
Vijay
OK. Now I see what you are trying to achieve here.
You want to synchronize files from Linux rather than from WIndows.
In that case I’d say you might want to check rsync command on Linux.
That allows you to synchronize local and remote files and folders.
Tried it worked very well in LAN but when it was a remote connection it gave me an error as “mount error (115): Operation now in progress. Refer to the mount.cifs (8) manual page. Tried all possibilities. Manually trying to mount it gives the same error. Made an mount point in /etc/fstab .. same errro. Tried with smbclient.. Connection to x.x.x.x failed (Error NT_STATUS_IO_TIMEOUT)… checked with firewall no blocking made any to any available at both source Linux and destination Windows XP… Checcked with telnet it was not communicating..checked with the ports 139 & 145 … Dont know what the issue is???
Are you mounting CIFS filesystem using hostname? If yes, please make sure Linux can resolve name of Windows machine to IP address.
If it won’t be able, please add entry for Windows computer to /etc/hosts file.
Also, try to ping IP address and then name of Windows computer.
Additionaly you can check Windows Firewall, if it allows file sharing (for testing purposes you can turn off firewall on Windows machine – but it is not recommended permanently).
Please suggest how to add Proxy server in it.
We need to send a file on SFTP server through Proxy server. Request you to please suggest the code for it.