Many times I came across one issue… how to grant access to CLI (Command Line Interface) on Cisco devices without creating separate username and password for each user on each device? In order to resolve that I did use AAA features of Cisco IOS and built-in Windows Server 2008 R2 component – NPS (Network Policy Server).
Those two mixed together can create very nice environment which allows flexible management who, when and how can access network devices. Same time, Active Directory will be central place to grant or deny access to devices as well as enforce specific privilege level.
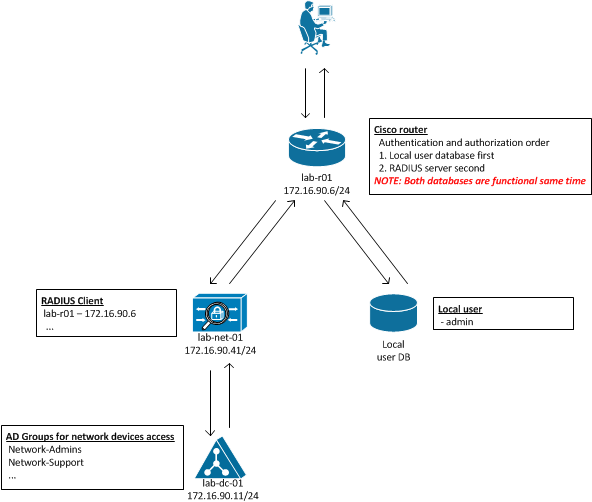
Below is simple diagram of the whole process and steps which take place when accessing Cisco device integrated with NPS/RADIUS.
What happenes when accesing router integrated with RADIUS:
- Operation initiates SSH or Telnet connection to device and enters credentials (username/password)
- Cisco router checks local database for username and password
- Once credentials found in local database operator has access to command line on router
- If credentials not present in local database then request for authentication and authorization is forwarded to RADIUS
- RADIUS checks credentials and group membership with Domain Controller
- If user is member of Network-Admins or Network-Support group access to CLI is granted and Operator can access router, otherwise Operator can’t access Cisco router
Let’s see how to configure whole solution step-by-step…
Objective
NPS integration with Cisco will deliver solution which will allow to authenticate and authorize access to Cisco devices Command Line Interface (CLI) with Active Directory credentials. In addition to that, privilege level will be detemined and enforced based on Active Directory group membership.
Actions which will be taken:
- Appropriate groups will be created in Active Directory
- Network-Admins – for users which will have privilege 15 access to Cisco devices
- Network-Support – for users which will have privilege 1 access to Cisco devices
- Microsoft NPS Role will be added to Windows Server 2008 R2
- Network Policies will be created on NPS/RADIUS
- Cisco router will be added to NPS/RADIUS as client
- Appropriate configuration will be applied to Cisco router
Microsoft NPS Server Role Installation
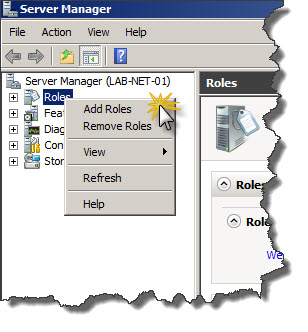
First step is to install NPS on Windows Server 2008 R2. in order to do that Server Manager has to be used. In Server Manager right-clik on Roles and choose Add Roles from context menu.
On Before You Begin screen click Next to proceed to Role selection screen.
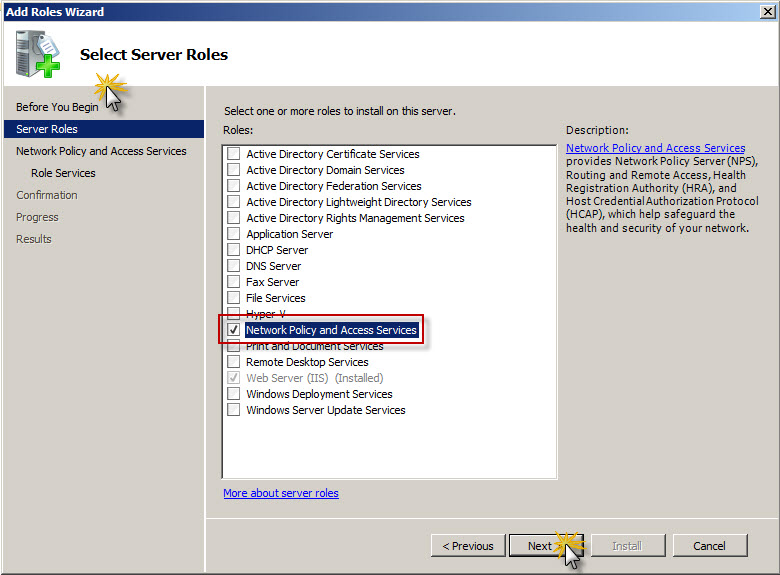
On Roles list locate Network Policy and Access Services, make sure that checkbox on the left side of that role is checked and click Next to proceed to next installation screen.
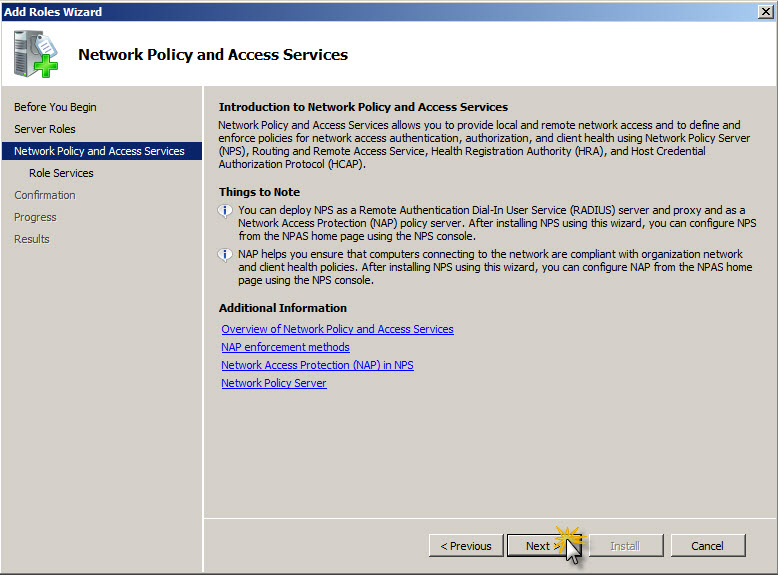
Next screen is Introduction to Network Policy and Access Services. Click Next to proceed to Role Services selection screen.
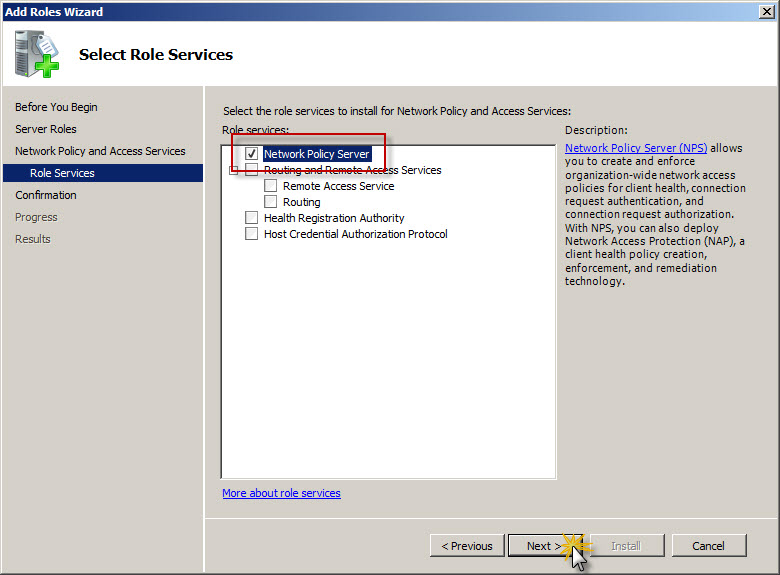
On Select Role Service screen make sure that Network Policy Server checkbox is checked and click Next to proceed to installation summary screen.
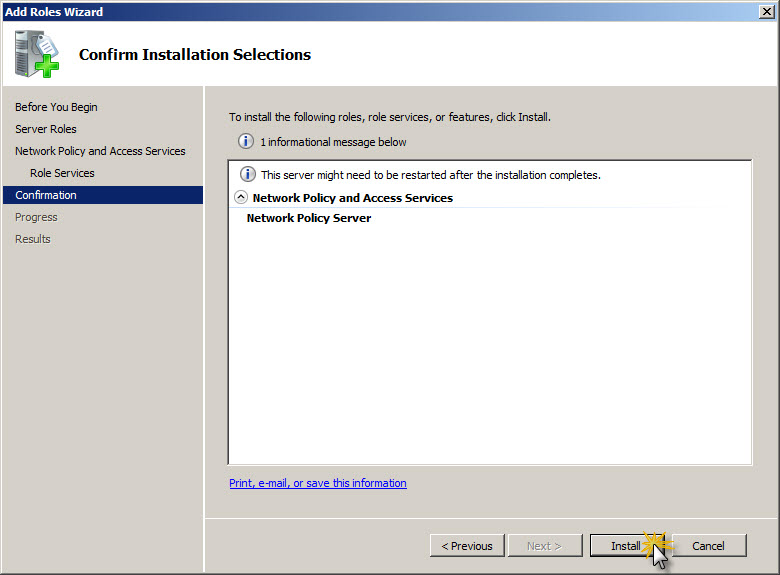
On Confirm Installation Selections screen review if Network Policy Server is shown on the list of services for installation and if everythign is correct click Install to proceed with installation and add new Role to system.
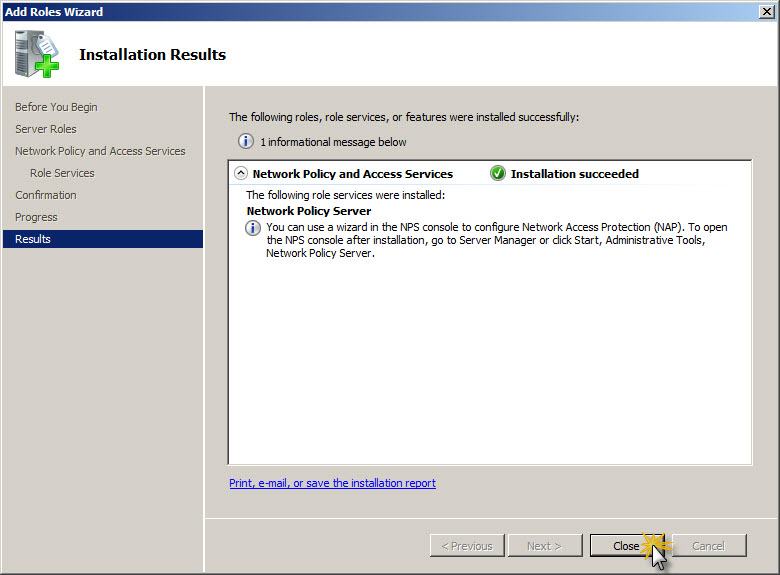
Once all components for new role are installed in the system you will see Installation Results screen where you can find indication if whole process went well ot some errors occured. Once everything went well click Close button.
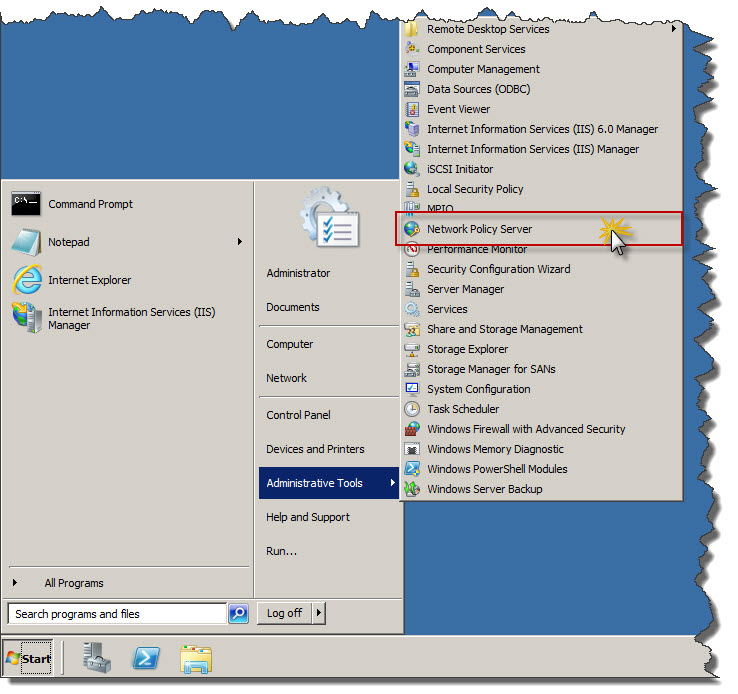
Now you can go to Start / Administrative Tools and find Network Policy Server icon which has been recently added to system as the effect of new role isntallation. Click that to start NPS management console.
Once you will start NPS management console you can see that one of the components of NPS is RADIUS. This is service we will need and use to provide authentication and authorization to Cisco devices basec on Active Directory credentials and group membership.
Register NPS in Active Directory
First we have to register Network Policy Server in Active Directory to allow authentication based on user accounts we created in domain.
To authorize NPS in AD:
- Logon to server with NPS using account with domain admin credentials.
- Go to Start / Administrative Tools and then click Network Policy Server.
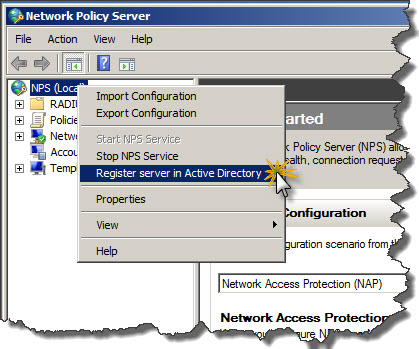
- Right-click on NPS (Local) and from context menu click Register server in Active Directory.
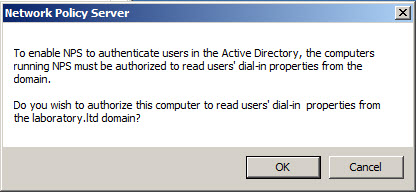
- Confirm that you want to authorize this computer (server with NPS) to access users’ dial-in properties by clicking OK in Network Policy Server dialog window. Make sure that authorization will happen in correct domain as per indication in message from system.
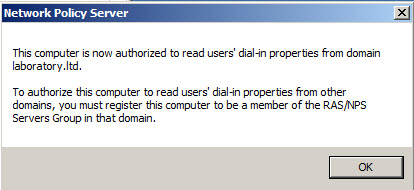
- When operation will be completed with success notification confirmation iwll show on the screen that this computer is now authorized to read users’ dial-in properties from domain.
For everyone who likes to reconfigure servers from Command Prompt here is how to add NPS to default AD domain:
- Log on to the NPS server using account with domain admin credentials.
- Open Command Prompt.
- In CMD window type: netsh ras add registeredserver
- Then press ENTER.
Add Cisco router as RADIUS client
Now it’s time to inform NPS/RADIUS about our router and establish shared secred as form of identification when router will be requesting authentication and authorization from RADIUS and Active Directory.
To add router as RADIUS client:
- Logon to server with NPS using account with admin credentials.
- Go to Start / Administrative Tools and then click Network Policy Server.
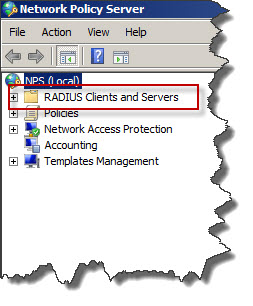
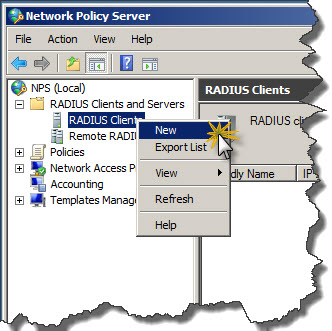
- Expand RADIUS Client and Servers.
- Right-click on RADIUS Clients and click New from context menu.
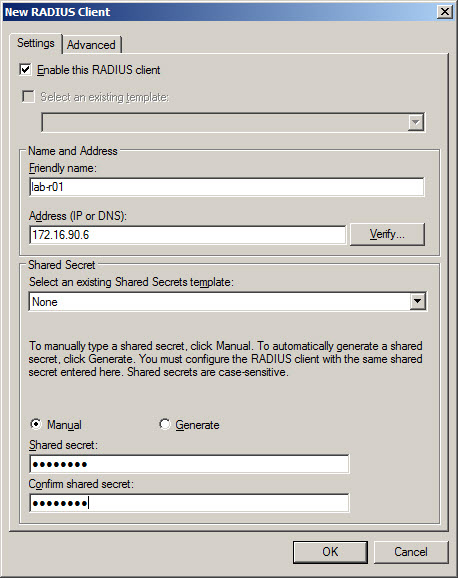
- In New RADIUS Client window Settings tab enter:
- Friendly name of the router – name to recognize router, usually same as hostname.
- Address (IP and DNS) – IP address of the router or hostname – if hostname used proper hostname needs to be registered in DNS prior to RADIUS configuration.
- Shared secret – passphrase which was configured on router which will allow to identify router when requesting AAA from RADIUS.
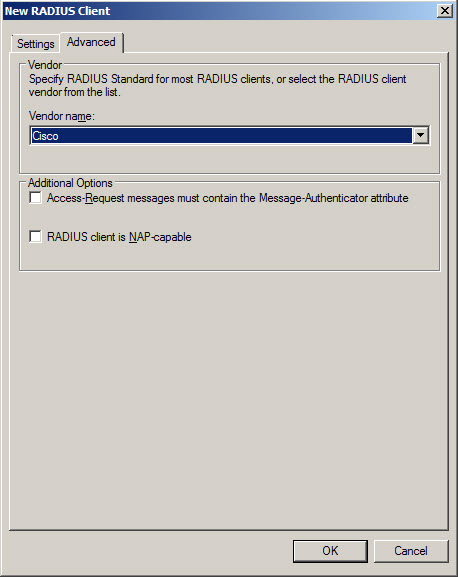
- In New RADIUS Client window Advanced tab enter:
- Vendor name – Cisco – as in this example Cisco router will communicate with RADIUS.
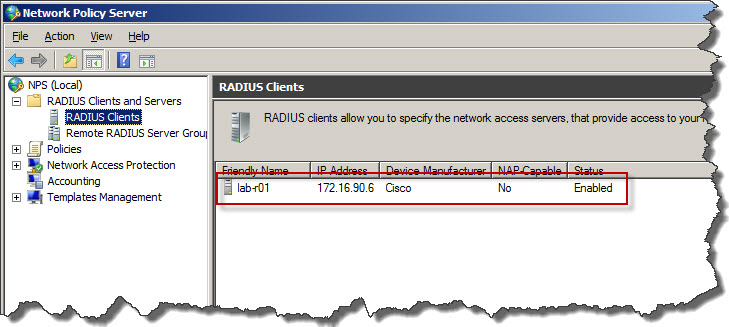
- Once confirmed with OK we will see that router has been added to RADIUS configuration as client.
Adding new NPS Policy for Network Admins
Now it’s time to create Network Policies, which will allow users to access certain devices and enforce particular privilege level on Cisco device.
To add Networ Policy:
- Logon to server with NPS using account with admin credentials.
- Go to Start / Administrative Tools and then click Network Policy Server.
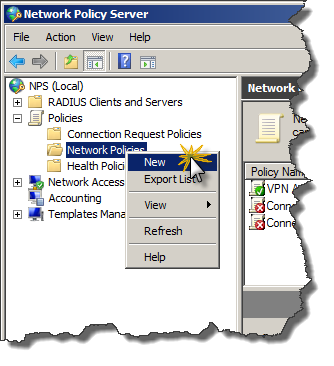
- Expand Policies.
- Right-click on network Policies and click New from context menu.
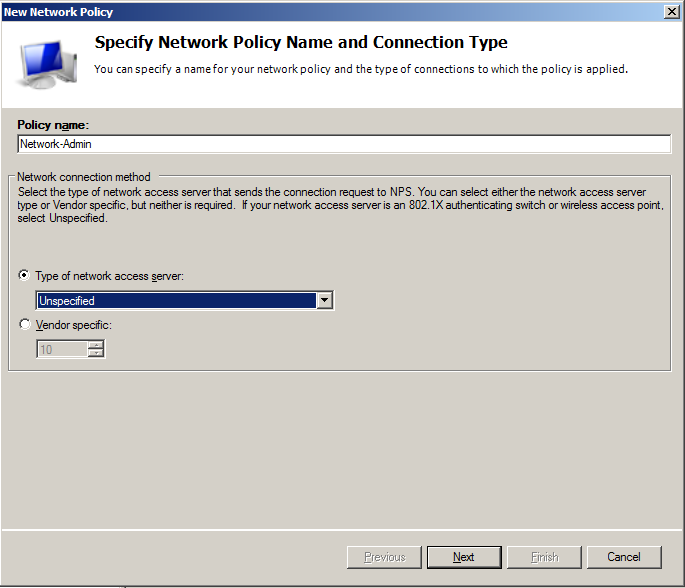
- On Specify Network Policy Name and Connection Type dialog specify policy name, which in that case is Network-Admin and leave Type of network access server as Unspecified.
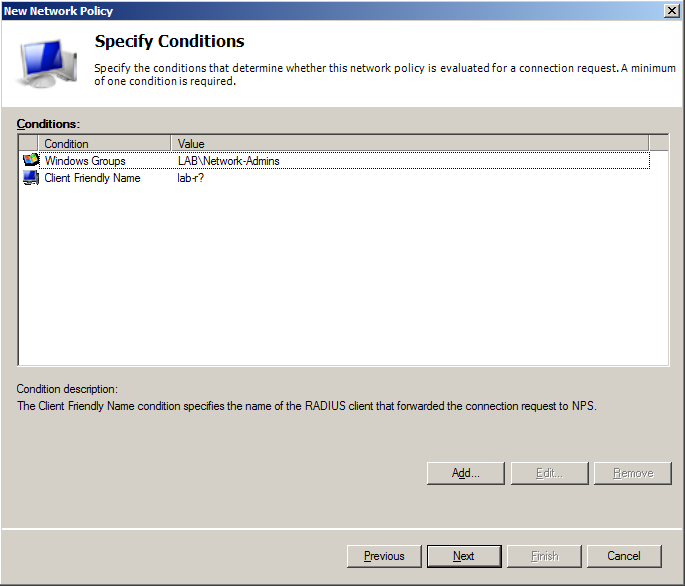
- On Specify Conditionsscreen add 2 parameters:
- Windows Groups – and specify Network-Admins group from Active Directory
- Client Friendly Name – and specify name of device(s) from which operator will have access (in that example router has name lab-r01, so I’m adding lab-r? as Client Friendly Name, which means all devices which have name starting with lab-r, question mark in client name means any string of characters)
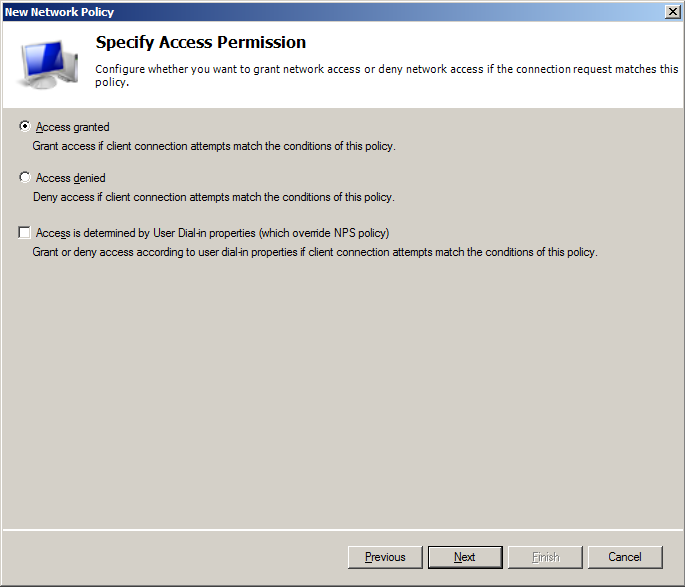
- On Specify Access Permissions make sure that Access granted option ich clicked and Access is determined by User Dial-in properties checkbox is cleared.
- On Configure Authentication Methods make sure that Unencrypted authentication (PAP, SPAP) checkbox is checked.
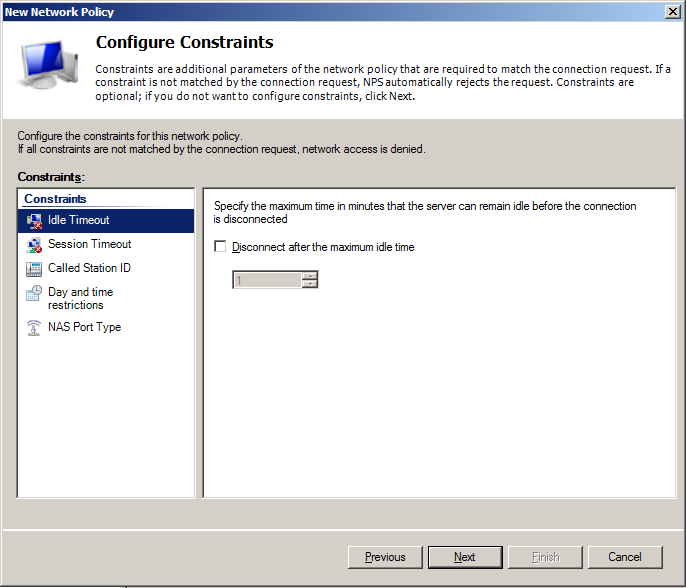
- On Configure Contraints screen no changes, so click Next to move on to next step
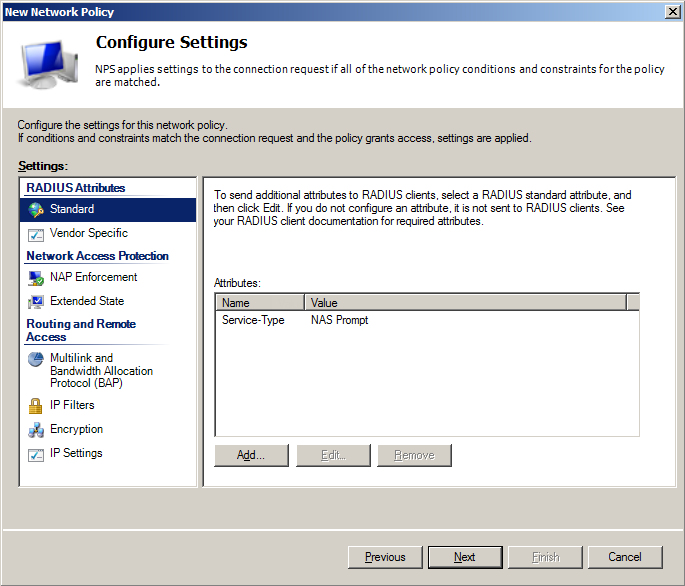
- On Configure Settings screen in Standard section add Service-Type parameter with value NAS Prompt
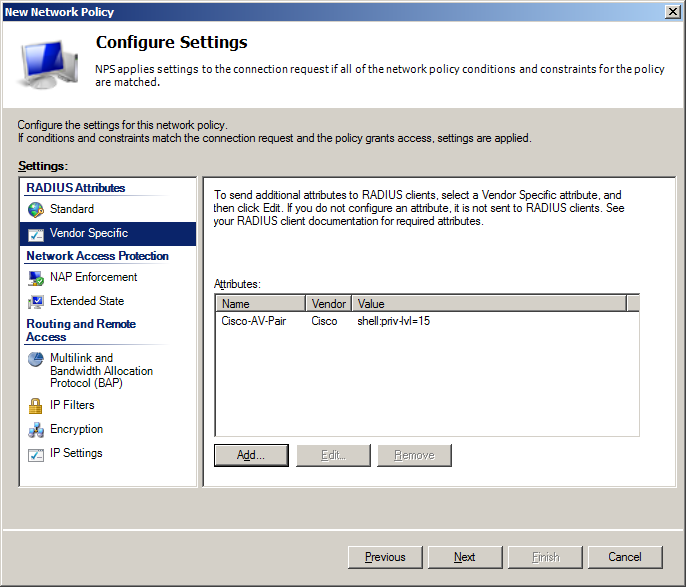
- On Configure Settings screen in Vendor Specific section add Cisco-AV-Pairparameter with value:
- shell:priv-lvl=15 – for Network-Admins policy which will enforce privilege level 15
- shell:priv-lvl=1 – for Network-Support policy which will enforce privilege level 1
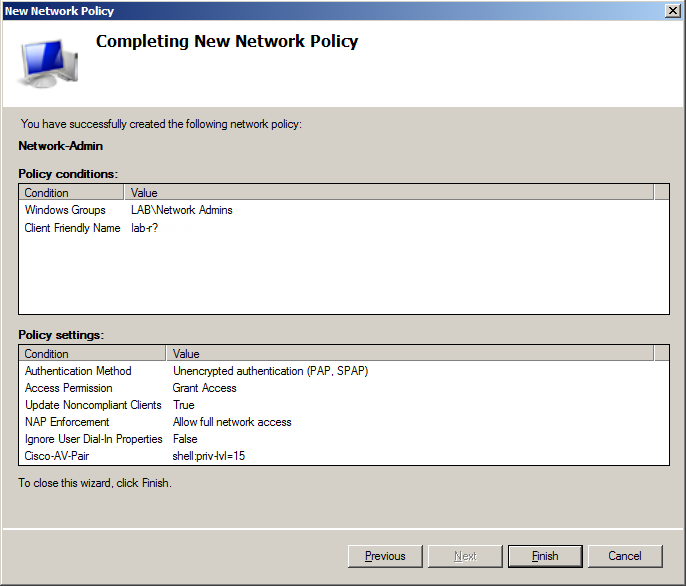
- On Completing New Network Policy screen review summary and click Finish to create network policy
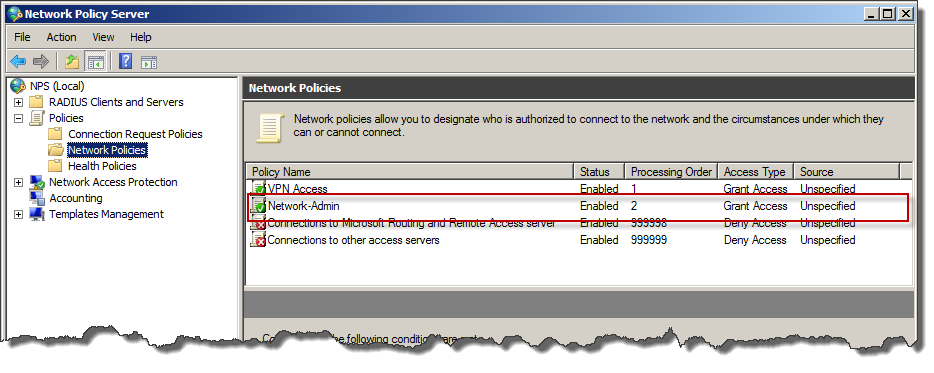
Below created policy on Network Policies list.
Repeat steps in Adding new NPS Policy for Network Admins section to setup policy for each privilege level you want to enforce on Cisco devices.
Define appropriate parameters on Configure Settings screen in Vendor Specific section using Cisco-AV-Pair parameter with value:
- shell:priv-lvl=15 – for Network-Admins policy which will enforce privilege level 15
- shell:priv-lvl=1 – for Network-Support policy which will enforce privilege level 1
Of course shell:priv-lvl might contain numbers between 1 and 15.
Configuration on Cisco IOS
It is time to inform our router or switch that all attempts to access device via telnet or ssh should be authenticated and authorized in local database and if username or password doesn’t match then go to RADIUS.
aaa new-model
!
aaa group server radius IAS
 server 172.16.90.41 auth-port 1812 acct-port 1813
!
aaa authentication login userAuthentication local group IAS
aaa authorization exec userAuthorization local group IAS if-authenticated
aaa authorization network userAuthorization local group IAS
aaa accounting exec default start-stop group IAS
aaa accounting system default start-stop group IAS
!
aaa session-id common
radius-server host 172.16.90.41 auth-port 1645 acct-port 1646 key secret12key
radius-server host 172.16.90.41 auth-port 1812 acct-port 1813 key secret12key
!
privilege exec level 1 show config
!
ip radius source-interface fa0/1
!
line vty 0 4
 authorization exec userAuthorization
 login authentication userAuthentication
 transport input ssh telnet
!
line vty 5 15
 authorization exec userAuthorization
 login authentication userAuthentication
 transport input ssh telnet
Test if implementation was successful
For testing purposes I setup 2 users i LAB domain:
- akim – member of Network-Support group
- apearson – member of Network-Admins group
- apeters – member none of network admin or support groups
Network-Support member is accessing device
When member of Network-Support group will access deivce privilege level 1 is enforces and according to configuration with that privilege level user can display configu on the screen.
C:\>telnet 172.16.90.6

User Access Verification

Username: akim

Password:

lab-r01>sh conf
Using 1769 out of 57336 bytes
!
version 12.4
service timestamps debug datetime msec
service timestamps log datetime msec
no service password-encryption
!
hostname lab-r01
!
boot-start-marker
boot-end-marker
!
enable secret 5 $1$U7IF$U8hEIH38g7KWwf9Sc8tt.1
!
aaa new-model
!
!
aaa group server radius IAS
server 172.16.90.41 auth-port 1812 acct-port 1813
!
aaa authentication login UserAuthentication local group IAS
aaa authorization exec UserAuthorization local group IAS
aaa authorization network UserAuthorization local group IAS
aaa accounting exec default start-stop group IAS
aaa accounting system default start-stop group IAS
!
lab-r01>
Network-Admins member is accessing device
When member of Network-Admins group will login to device automatically privilege level 15 is enforced, so full access to device is granted.
C:\>telnet 172.16.90.6

User Access Verification

Username: apearson

Password:

lab-r01#conf t
Enter configuration commands, one per line.  End with CNTL/Z.
lab-r01(config)#
Member none of the network admin or support groups is accessing device
When user is not a member of any of authorized groups (neither Network-Admins nor Network-Support) access to device is refused.
C:\>telnet 172.16.90.6

User Access Verification

Username: apeters

Password:

% Authentication failed

Username:
Enjoy 🙂



Thanks for the how to,
exactly what i was looking for.
Cheers,
Chris
Glad to help 🙂 If you want to see any other solutions just submit request from Contact page 🙂
Do you have details for NXOS? I am trying to work my way through a setup for an MDS9148, and the authentication does work, but I only get a priv-0 account, and even worse, the local admin account doesn’t work for some reason – I need to remove the RADIUS config from the switch before I can get a network-admin account again.
Unfortunately didn’t get a change to work with NXOS yet. Once I get a chance will try to test solution and find out if it is possible to integrate that with NPS.
Regarding NXOS. Replace “shell:priv-lvl=15” with “shell : roles = network-admin” and “shell:priv-lvl=1” with “shell : roles = network-operator”.
I have successfully implemented it for authentication to a Nexus 5596 via Radius.
To see all the roles available, use the show roles command.
I’m currently working on post about NX-OS and Microsoft NPS. That should be published soon.
This is what I was looking for.Thank you so much SKufel.Well written.
HI
I have been trying to get RADIUS authentication/authorisation working on ISE for Cisco WAAS.
I am looking to use privilege 15 and privilege 7 access to Cisco WAAS running version 4.2.1
I get authenticated successfully via AD for the Cisco WAAS but I don’t get authorised. The AV pair I am using is shell:priv=15
Switches and Routers all work fine using the AV pair above. I believe there is a different AV pair that is needed.
Is there a sample configuration for Cisco WAAS using ISE? Or do you know what av-pair is needed to be able to authorise the WAAS.
Thanks
Manjeet Singh
Hi,
I never had a chance to work with Cisco WAAS, but will try to find out.
Thanks,
SKufel
Thanks for the great article. How did you differentiate between your VPN and SSH users?
Based on group membership. All policies I have for network devices are at the beginning and they do exact match of devices naming convention and group membership in AD.
SKufel
What about on devices that you want to control SSH and VPN access for different groups? How does NPM know which request is being made? We are trying to find some way to differentiate between these on the NPM server.
I too am having the identical issue on my end… just curious if you’ve had an opportunity to dig into this yet.
Unfortunately didnt’ get a chance to complete full configuration on NXOS and Microsoft NPS.
I have half of it configured, just have to document that.
Brilliantly done! Thanks to your hard work, I am able to utilize NPS now.
Brian asked about controlling SSH and VPN access for different groups. We encountered the same problem, where all users were authenticated against the ASA’s as admins, because the ASA’s didn’t know how to request different levels of users, and the NPS didn’t know the difference between someone in the Admins group or the VPNUsers group.
I believe this is done through the Class attribute – https://supportforums.cisco.com/docs/DOC-15074 .
Wow… This worked great for our test 2950. Thanks for a perfect blog entry. I think that I am in love (well, virtually anyway).
Hi,
very interesting thank you, however do you know if there is something else to change when renaming the sw hostname ?
The exact same configuration as your has been setup here and i had to change some sw’s hostnames. However i ahev edited the radius Client and Policy accordingly but i got error from radius server saying that The radius client is not valid.
I tryed to clear the cache on the SW but i cant reload it.
If i leave the old policies on the radius this works fine, SW seems to send its previously configured hostname to the server.
Thanks you very much if you have any ideas.
Florian
Hi, Thanks for nice article. What change I want in this article is the condition of restricting access from specific IP Addresses as well as the windows user groups. Please help. I really need this. I have tried specifying IP address in IPv4 client but might be syntax error. Any help is greatly appreciated.
Muhammad Younas
Hi,
Do you know if it is possible to use an authentication method with encryption instead of PAP(unencrypted)?
It seems to me that you don’t want your AD user accounts to pass through your network clear text.
Nice article b.t.w.
Regards,
Wobbe.
I configured NPS 2013 server properly and I have done it several times in the past for client authentication using laptops or desktops. This time I am trying to access from Qlogic 8gb 20-port SAN switch module for IBM blade center but, username or password is not recognized from the switch. Switch is normally configured and pointing to Radius server which is windows 2012 NPS server. How can I troubleshoot this so I can log in from switch as radius client. Default switch account works with no issue but, Active Directory account has issue. We use LDAP authentication for AD users. All setup is verified and is correct. Please advise
this is great thank you! How about using MS_CHAPv2 for authentication instead unencrypted auth?
again thank you!
I just noticed that you configured local first prior to the IAS group. So if you have a local database then that will be used instead of RADIUS. Is that right? I cannot make authorization and accounting work though.
To piggy back on an earlier question. Is there any way to add a second verification proccess. What is to stop the system admins that create the groups for the network team from adding their accounts to the group and now being able to log into the router. In my case I do not control the AD server and would like to add a second verification. I have tried adding an IP and all is failing.
Thanks for the great article.
Muhammad, did you ever figure out how to require a second verification process. I have the same issue where I am concern with the AD admins adding thier accounts to the allowed cisco group and being able to login into the router.
Thanks
Wow, my configuration worked first time using this guide! Saved me having to read Cisco documentation for the next 24 hours before I can understand how to use it in real life. Thanks Szymon!!!
Great tutorial, but as other posters hinted isn’t using the unencrypted option extremely insecure? Are the AD credentials encrypted by ssh at least when going over the wire (assuming you ssh-ing into the router)?
Its not uncommon in many shops for the person managing the cisco gear to also be a domain admin. You could have just opened up your entire AD infrastructure!
Great Tutorial, thanks it has got me 99% there, however I am doing this for a Cisco 5508 Wireless Lan Controller and the logged on user is unable to save any changes, so assuming getting lvl 1
Any idea?
Thanks
Roger
Hi Roger,
only situation when I had same effect was when IOS did not have support for RADIUS change of authorization (COA). That happened on Cat3560 switches and as a result had to upgrade to advancedIP and certain version of IOS to have this feature supported.
Check with Cisco reference guide for wireless controller if operating system it has supports COA.
skufel
Thanks for your article. One question; what is the consequence of using PAP, SPAP (Unencrypted authentication?) Does it mean that NPS>Client handshake may be sniffed? Thanks.
PAP is just clear text, which means that once sniffed can be used.
SPAP is encrypted using reversible method and it is easy to decrypt once captured.
Both not recommended in highly-secure environments.
Thank you so much for your guidance!!
Hello!
Can I combine the domain controller and Radius server in One machine?
Like I will enable the Active Directory and NPS role in One Machine.
Thanks.
Sure, you can. However it is not recommended.
skufel
Do you have any suggested topology that I can use? Thanks.
If it is not recommended, can i just separate them in 2 VM’s? Thanks..
Thanks Syzmon! Works like a charm for our Nexus 9000!
thank you ……
amazing…… fantastic…..!!!!!!!!!!!!!
exactly what i was looking for same ………….
excellent work mate!
i was all done with the ios config but couldn’t find this microsoft attribute 6 option!
cheers
Lou
Which one exactly do you mean?
To be honest I never had a chance to work with Huawei devices and I don’t have any.
Do you know if there is ability to run Huawei devices as virtual machines or some kind of hypervizor (similar to GNS3 for Cisco)?
If it is possible to setup Lab environment with Huawei on PC, I’m more than happy to setup and write how to integrate Huawei with AD.
Let say I have added multiple switches in Radius. Now I like to change the password of all the switches in one go then how it will be possible. Please help me out on this.
Thank you! This was helpful.